LED DIMMER

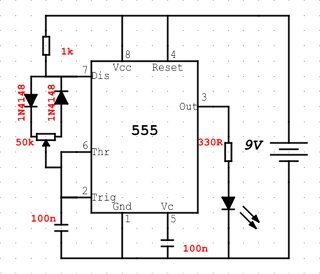
This is a simple circuit that will adjust the brightness of one or more LEDs from 5% to 95%. I have used only only one LED. Only place where you can go wrong in this project is while connecting the diode, so connect the diode properly.

I will add the connections later.

image

image

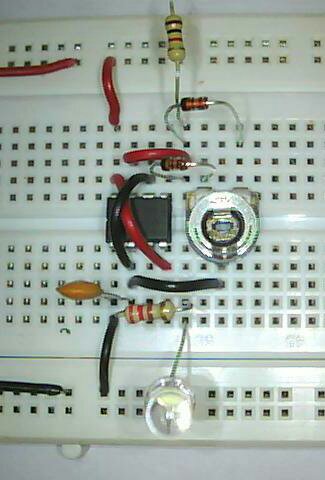
In my breadboard arrangement I have not connected the 100n between the pin5 and negative rail and the resistor I used is 220R instead of 330R in the circuit diagram.

COMPONENTS REQUIRED:

1. 555 timer IC
2. 47k POT
3. 1N4148 diode x2
4. 1k resistor
5. 330R resistor
6. 100nf capacitor (code 104) x2
7. LED
8. Battery
FLASHING LED

This is a simple LED project for starters and one of the first LED project that I did .It will make the LED flashing at the rate I decide . I had lot of fun doing this one , every time I changed the value of resistor or capacitor , LED keep changing the time between flashing . Let’s build this thing.

image

image

Connection :-

1 . Connect pin 2 and pin 6 of 555 IC
2 . Connect pin 4 and Pin 8 of 555 IC
3 . Connect 47mF capacitor +ve ( longer leg ) to pin 2 and -ve to ground.
4 . Connect +ve (longer leg leg ) of LED to pin 3 and -ve to pin 1
5 . Now connect one of the 10k resistor between pin 8 and pin 7
6 . Now connect other 10k resistor between pin 7and pin 6
7. Finish the circuit with battery connection , +ve to pin 8 and -ve to pin 1

If you have problem in identifying the pins of 555 timer IC checkout my post on the 555 timer IC which helps to identify the pins and the function of each pins.

If your connection are correct LED Will be flashing . If you are haveing problem with circuit , leave a comment and I Will help you.

Components Required :-

1. Resistor – 10k x 2
2. Capacitor – 47mF
3. White LED
4. 555 IC
6. Wire
7. 9V battery